How to encrypt email in Gmail & Outlook
Most email providers, including Gmail and Outlook, allow encryption. Follow our step-by-step guide on how to send encrypted emails based on your email services provider and device.
In short:
- To send encrypted emails in Gmail you have the following options:
- If you have a business account, enable S/MIME on Gmail
- If you don’t, you’ll need to enable end-to-end email encryptionthrough a third-party provider such as FlowCrypt or Mailvelope
- Alternatively, you can encrypt your email copy manually useing a manual PGP/GPG encryption tool.
- To send encrypted email in Outlook:
- Obtain a digital certificate
- Add a secure email certificate in Outlook
- Share the public key with your intended recipients
- Decide whether you want to encrypt one email or all your outgoing emails:
- If you want to encrypt a single email: create a new email, open security settings, and check the box “encrypt message contents and attachments.”
- If you want to encrypt all emails: click on the email security tab and check “encrypt contents and attachments for outgoing messages.”
Let’s look a how to do that step-by-step.
How to send encrypted messages in Gmail
By default, Gmail uses the TLS protocol to encrypt communication between Gmail and other email servers supporting TLS. In other words, the content of your email may still be accessible by the email service provider, including Google. There are four ways you can enable encryption in your Gmail account. Let’s look at them one by one.
Enabling S/MIME on Gmail
Google supports the S/MIME encryption method but only for users with enterprise-level G Suite Business access. Regular users of Gmail will not have this option.
Follow the steps below to enable S/MIME if you are a G Suite admin:
- Go to the Google Admin Console.
- Click on “Apps” and then “G Suite.” From the available options, select “Gmail” and then go to “user settings.”
- Select the organization or domain that you want to configure on the left-hand side of the screen. Set “enable S/MIME” encryption for sending and receiving emails at the bottom of the settings window.
- Click “save.”
Once encryption is enabled, you will still have to ask all users in your organization to reload their Gmail inboxes, upload certificates, and exchange keys. You will find detailed instructions for each of these steps in the Google Help Center.
Using third-party email encryption services
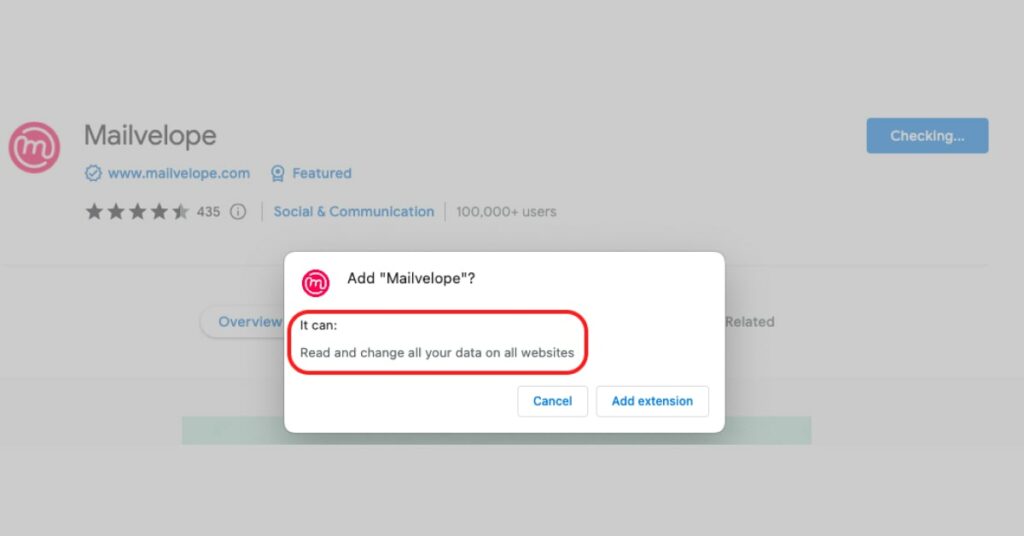
The easiest way for individual users to enable end-to-end email encryption in Gmail is through a third-party provider such as FlowCrypt or Mailvelope. Both providers rely on the PGP/MIME protocol, which is relatively easy to implement and use.
However, be aware that Chrome extensions such as these will ask you to grant access to everything you do online, which can compromise your privacy more than giving up on email encryption.
Using manual PGP/GPG encryption for Gmail
GNU Privacy Guard (GPG), also known as GNU PGP, is free and open-source software that can be used to implement the PGP standard. It is the most secure and complex way to encrypt messages.
First, download GPG software compatible with your device from gnupg.org.
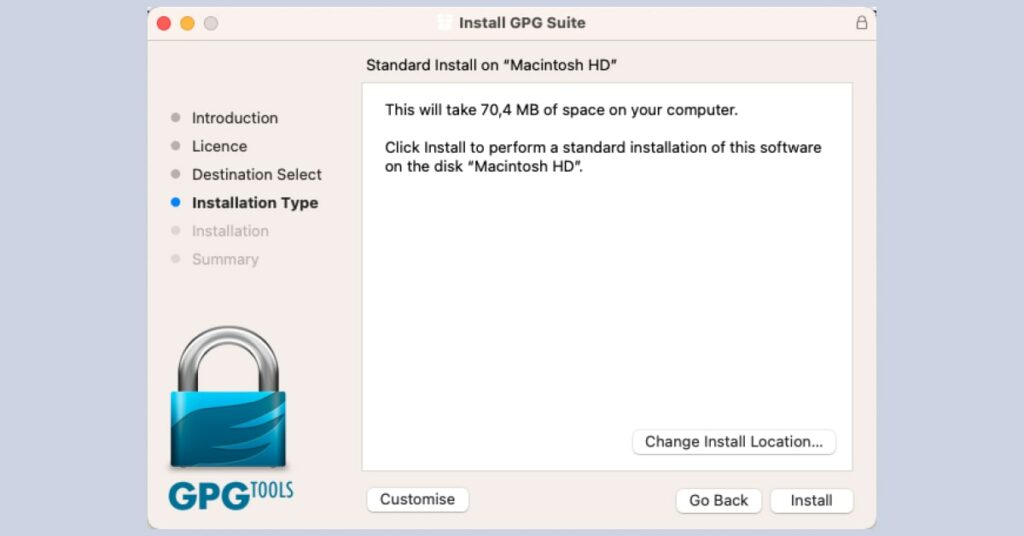
When running the installer, you can agree to the default settings. Once the installation is complete, you will be prompted to generate a key pair. The software will help you generate both your public key and the recipient’s public key.
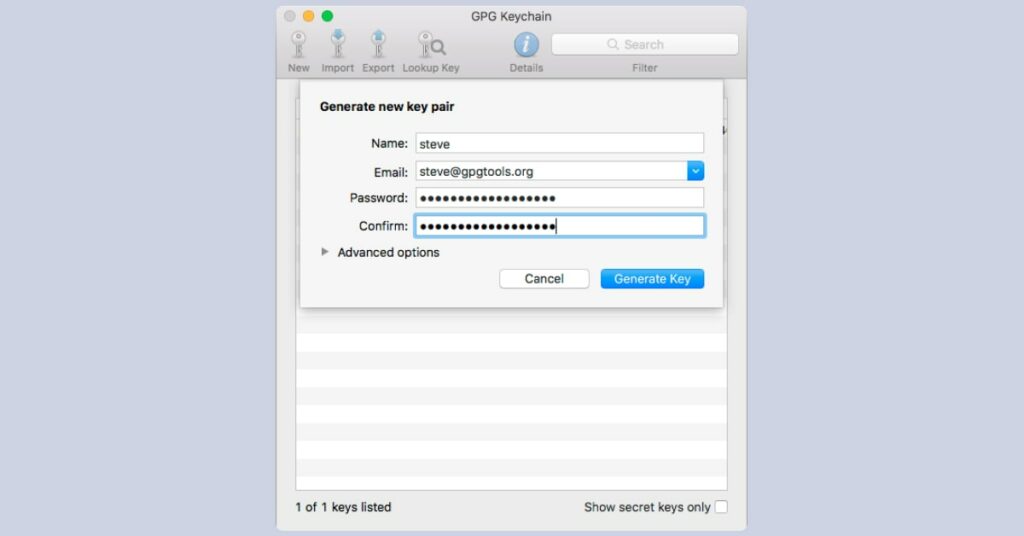
As the GPG tool is not integrated into Gmail, you must manually encrypt your messages and copy-paste them into Gmail. In other words, this type of encrypted message entails several extra steps for both sender and recipient and may be off-putting for less advanced users.
Send an email via Gmail confidential mode (not encrypted)
This mode offers enhanced confidentiality and privacy for sending messages. However, it is not an example of encryption. Remember that the recipient needs to have a Gmail or Google account to access messages sent in this mode.
With Gmail’s confidential mode, you can:
- Set expiration dates for your emails.
- Require recipients to enter a passcode to open your emails.
- Prevent messages from being copied, forwarded, downloaded, or printed.
- Revoke access to emails after they have been sent.
- Provide access to non-Gmail users with a one-time passcode.
- Enable a two-factor authentication process for recipients who aren’t signed in to their Google account.
To enable confidential mode in Gmail, click on the “compose” button to start a new email, then click on the padlock icon at the bottom of the email editor and adjust the settings.
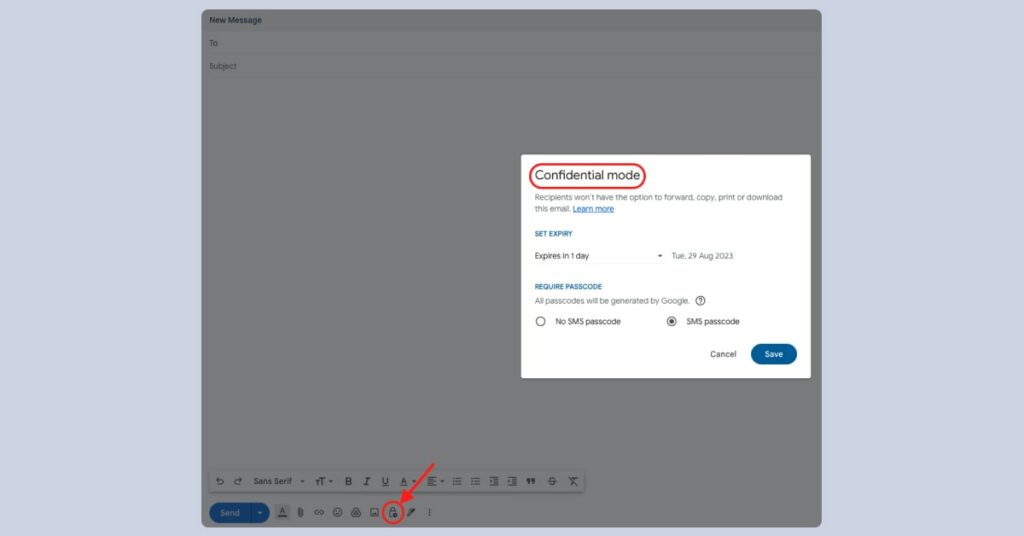
Once your message is ready, Gmail will prompt you to confirm your selected settings.
How to encrypt an email in Outlook
Compared to Gmail, Outlook offers a broader range of email encryption options. The email provider supports both S/MIME and PGP and allows users to configure security certificates, making it a better choice if you are looking for enhanced email security overall. These options are only available in the Outlook desktop app, which is part of the Microsoft 365 package.
There are several steps to complete before you can send your first encrypted message in Outlook. Let’s go through them one by one.
Obtain a digital certificate
Start by downloading a digital ID for Outlook. It’s a digital certificate that includes your public and private keys. You can buy it from a trusted Certificate Authority (CA) recommended by Outlook.
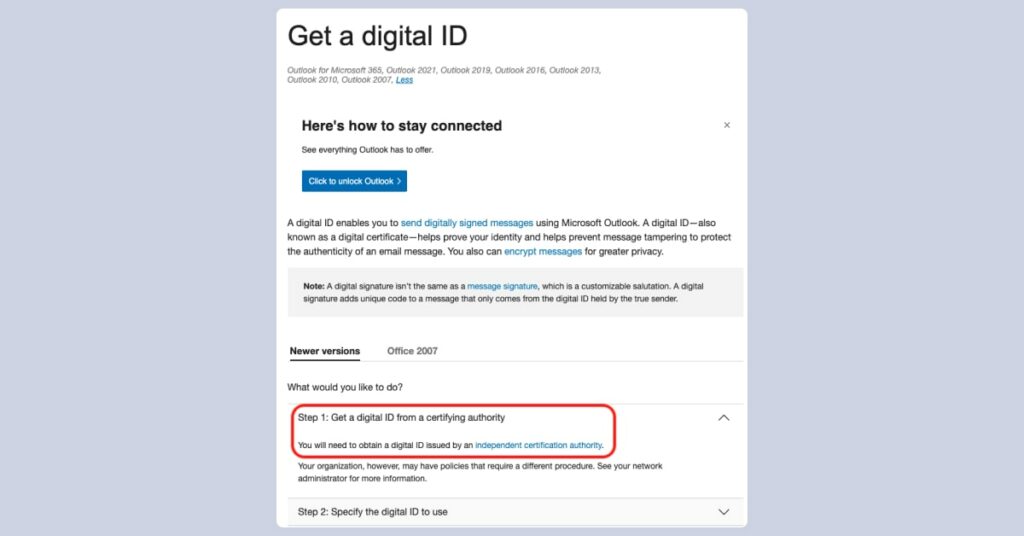
Once you have installed the digital ID, it should automatically appear in Outlook and other Office applications. To see if it’s there or replace it with a new one, go to “file” and select “options.”

Once in Options, click on “Trust Center” and then “Trust Center settings.”

In the “Trust Center” window, select “email security” from the menu on the left. Then click on “import/export” under “digital IDs (certificates).”
A new window will appear, allowing you to import the digital ID from a file. Once you do that, enter the digital ID’s password and click “OK.”
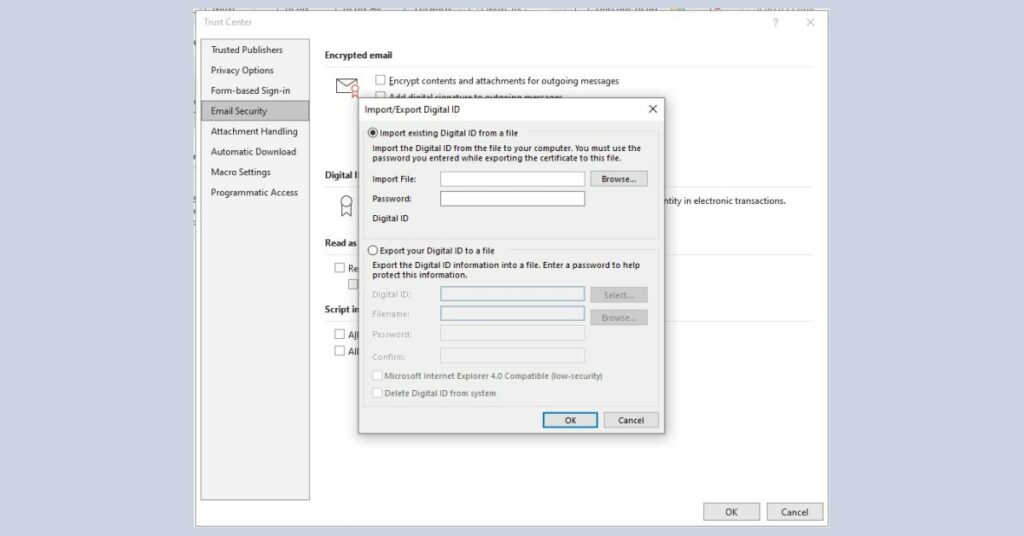
Add a secure email certificate in Outlook
Now that the digital ID is in place, you need to make sure that Outlook will offer to apply it whenever you send an email message. Follow these instructions:
In the same “email security tab,” go to the “change security settings” window by clicking on “settings” under “encrypted email.“

A new window will open called “change security settings.” Perform the following steps:
- Enter a name in the “security settings name” field.
- Make sure that the cryptography format underneath is S/MIME.
- Check the default security settings for this cryptographic message format.
- Click on “choose” next to “signing certificate.”
- Select a certificate (like the one you have imported in the previous step).
- Check the box next to “send these certificates with signed messages.“
- Click “OK.”
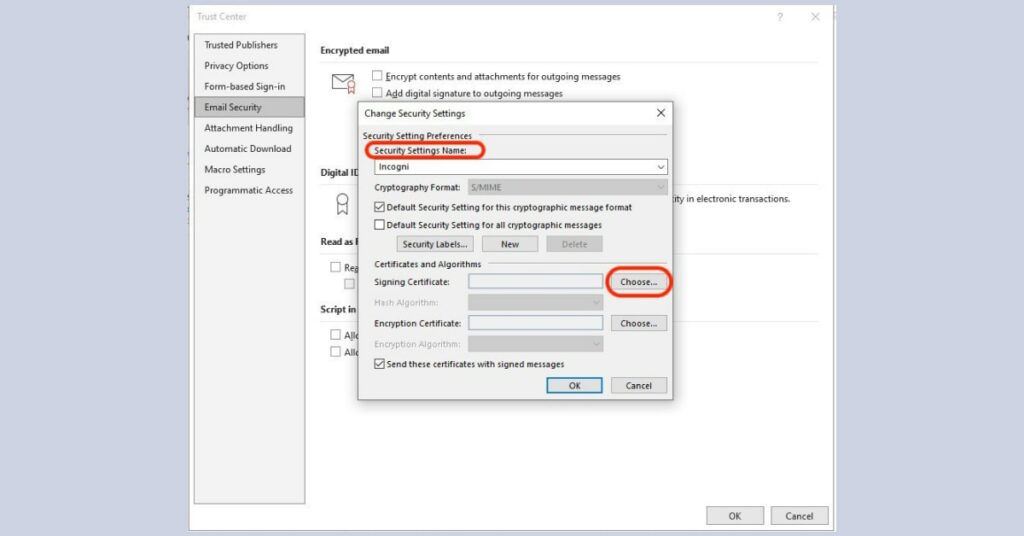
Now that you’ve adjusted email security settings and uploaded a digital ID, you can share your public key with your intended recipients by sending a digitally signed message.
- Start writing a new message.
- Once in the new message window, go to “options.”
- Click on the three dots on the right-hand side.
- Select “manage options” from the drop-down menu.
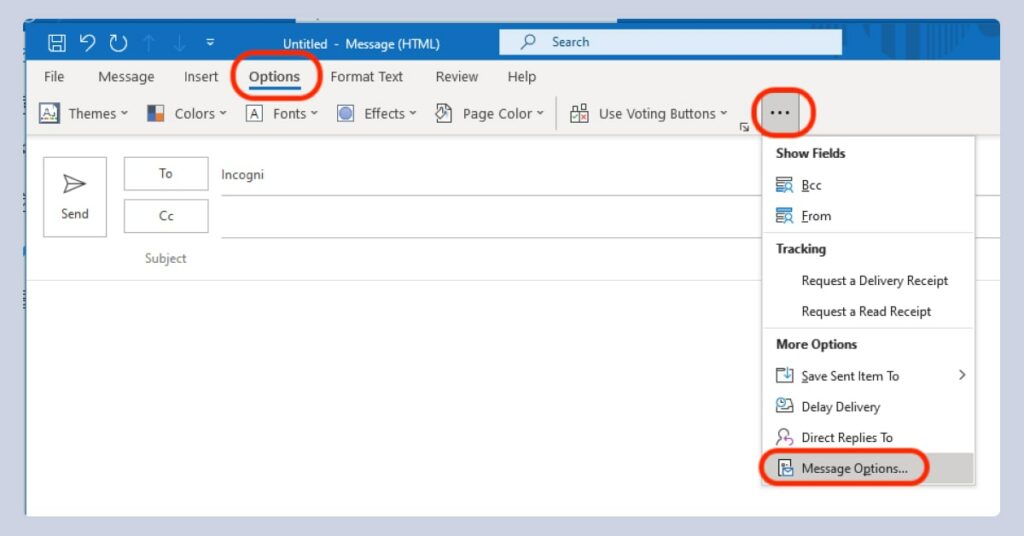
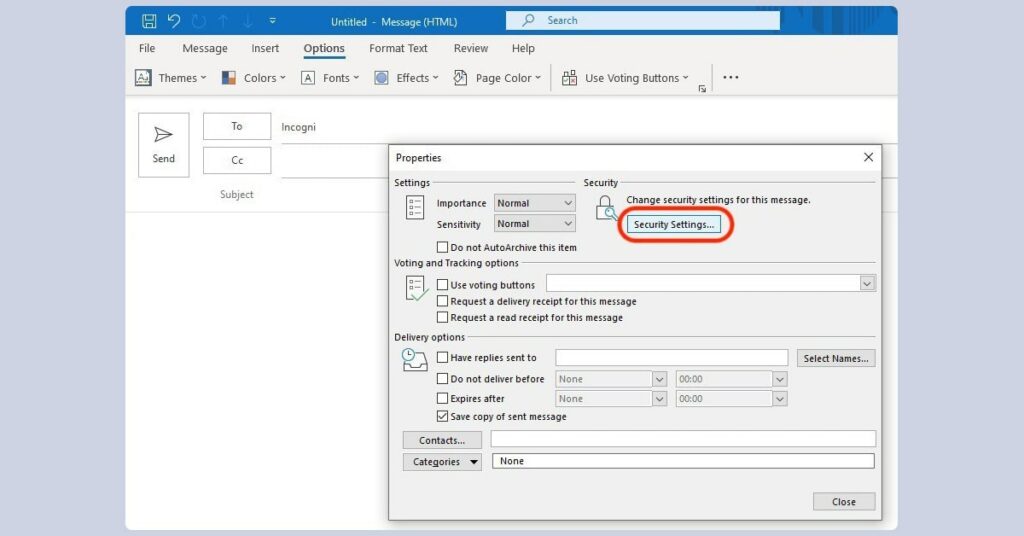
A new window called “properties” will pop up. Click “security settings.” This will take you to a “security properties” window.
- Check the box “add digital signature to this message.”
- Then click “change settings” and update the “security settings name.“
- Click “OK.”

Once the digital ID is added to the message, select the recipients in the “to” field and send. You may receive a digital ID in return. In fact, to send an encrypted message to an individual through Outlook, the recipient must share their digital signature with you. If they did, you would recognize this by the signature icon. Make sure you also add the recipient’s name to “Outlook contacts” to save their digital ID.
Decide whether you want to encrypt one email or all your outgoing emails:
Encrypt emails individually
Continue just like when adding a signature to the email:
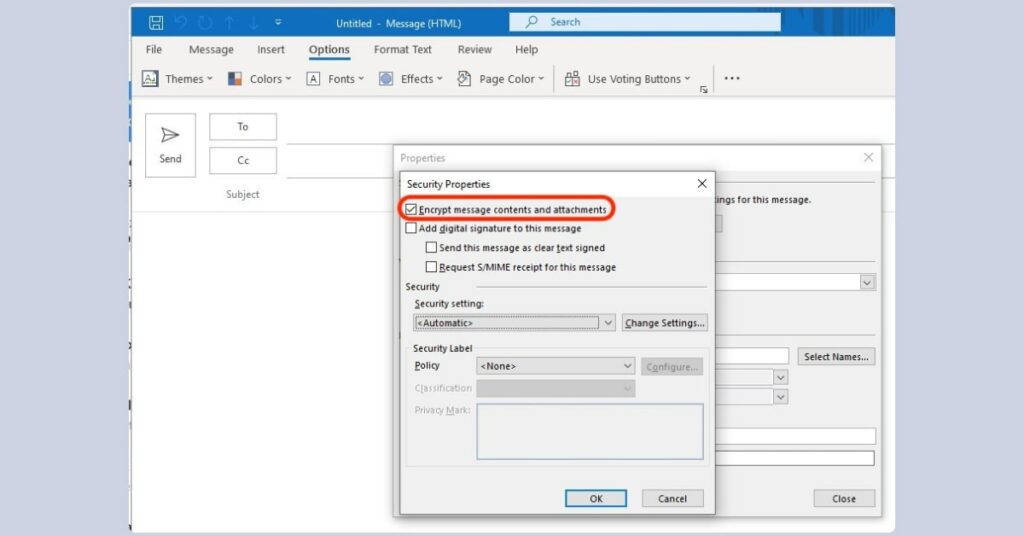
- Click on the three dots on the right-hand side and select “manage options.”
- In “properties,” click “security settings.”
- In the “security settings” window, check the box “encrypt message contents and attachments.”
Encrypt all outgoing messages in Outlook
If encrypting emails individually seems cumbersome, you can automatically encrypt all outgoing messages in Outlook. Recipients must possess your digital ID first to decrypt your emails. This solution is recommended for internal communication within an organization or company.
Here is how to automate encryption in Outlook:
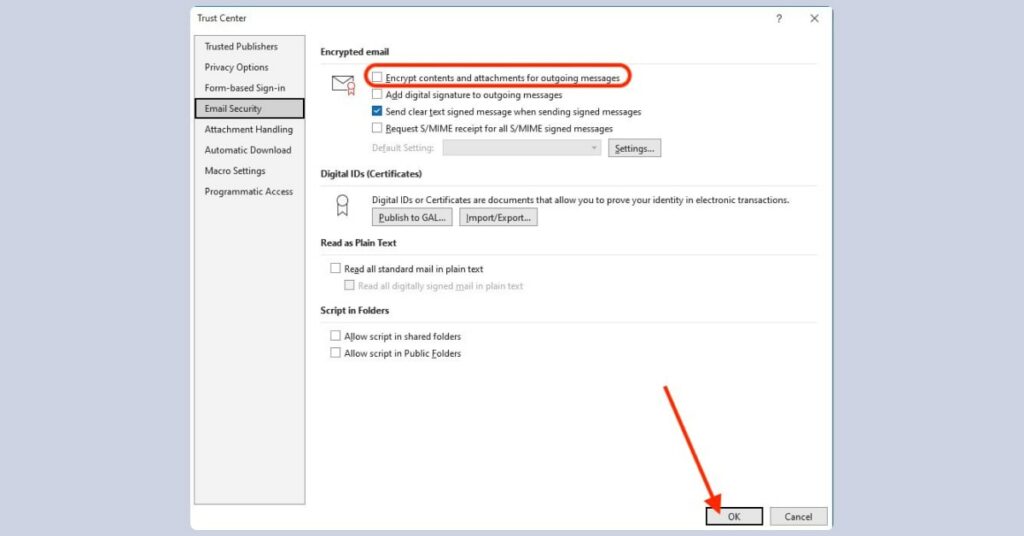
- Go to “file” and select “options.”
- In the “options” window, navigate to “Trust Center” and click “Trust Center settings.”
- Click on the email security tab and check “encrypt contents and attachments for outgoing messages.”
- Click “OK” to finish.
Using OME (Office 365 message encryption)
OME stands for Office 365 Message Encryption. It’s a security feature provided by Microsoft’s Office 365 suite that enables users to send encrypted emails to recipients, even if the recipient’s email service doesn’t support encryption. OME helps protect sensitive information by encrypting the email’s contents and any attachments, ensuring that only intended recipients can access the encrypted content.
If this type of encryption is configured for your organization, follow the steps below to send an OME-encrypted email:
- Create a new email message.
- Add recipients and content.
- You will see an “encrypt” button next to a lock icon in the email composition window.
- Click on it to activate OME.
- Attach files, if needed, and click on “send.”
The recipient will be notified that the message has been encrypted with Office 365 Message Encryption. They will need to follow some instructions to access the encrypted email.
What is the difference between encrypt and encrypt only in Outlook?
The “encrypt only” option encrypts emails in Outlook. The distinction between it and the “encrypt” option lies in their default behavior: “encrypt” includes encryption with a do-not-forward policy, allowing recipients to view and reply to but not forward or copy the email.
Sending encrypted emails on iOS
You can encrypt emails and sign them on the iPhone mail app with a digital certificate.
- Obtain and install an S/MIME certificate (or private key from a Certificate Authority)
- Obtain the recipient’s certificate or public key.
Once you have the S/MIME certificate installed, go to:
- “Settings“>”mail“>”accounts.”
- Select the email account from which you want to send encrypted emails.
- Tap the email address to access the “account” tab.
- In the “account” tab, tap “advanced.”
- You will see the S/MIME section at the bottom of the screen.
- Select “sign” to sign your emails with a certificate or “encrypt by default.”
- Use the toggle to turn either of these on.
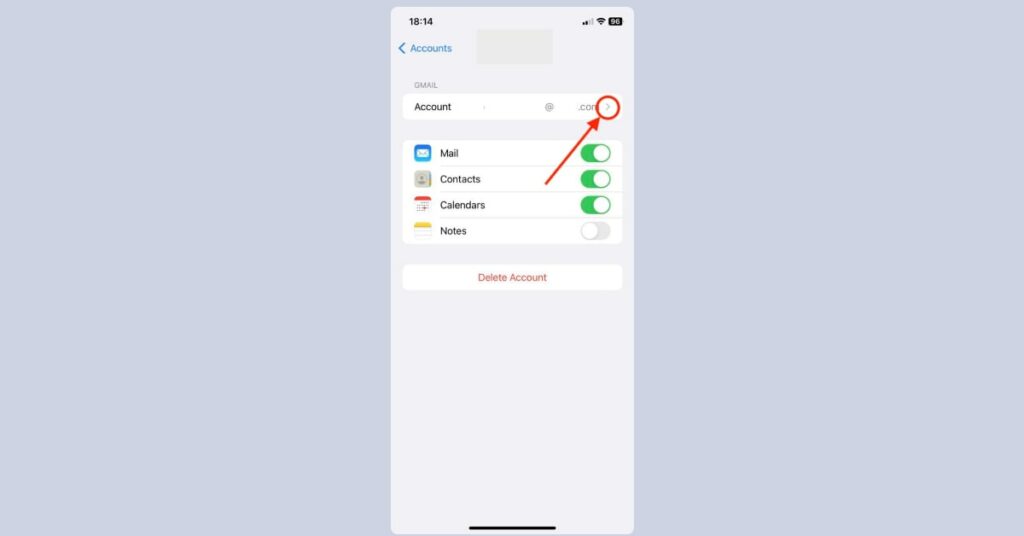
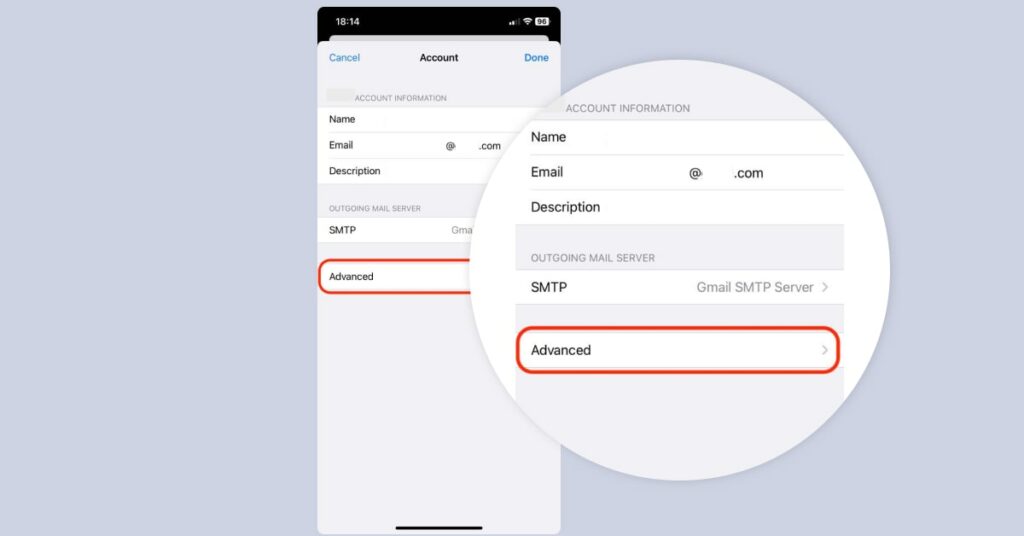
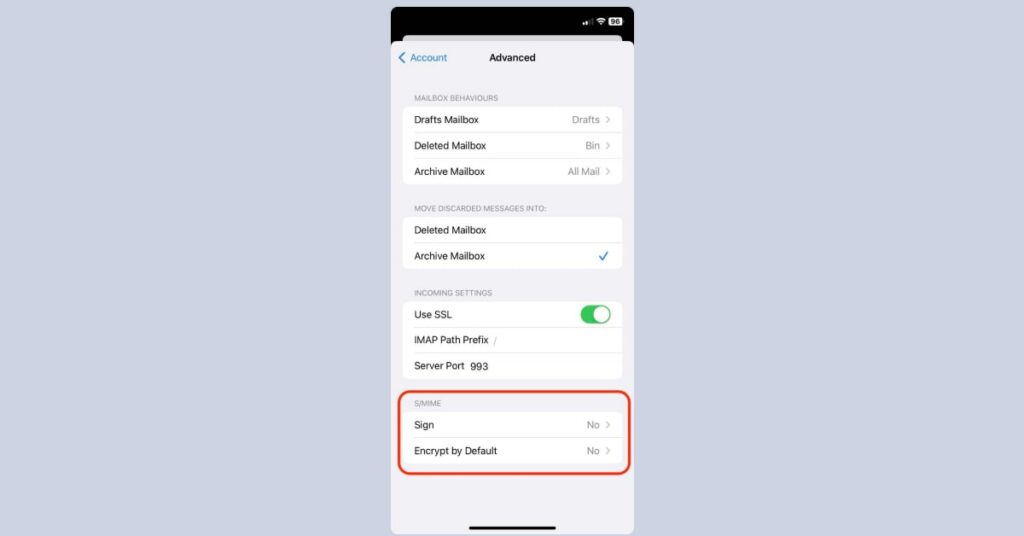
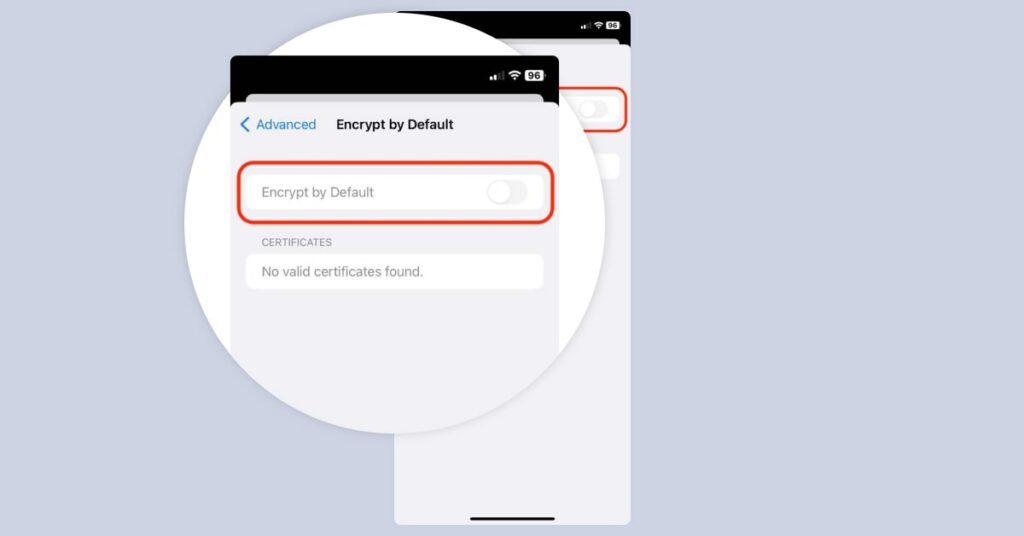
Once this setting is on, you will also need the recipient’s public key. Whenever you receive one, it will be stored in your Global Address List (GAL) together with other details such as name and email address.
To send an encrypted email from your iPhone mailbox, start a new email. If the recipient’s certificate is in your GAL, you will see a blue lock button in the address field. Make sure to tap it so that it’s closed. If you see a red lock icon instead, the recipient has to send you their key before you can start exchanging encrypted messages.
How to encrypt email on Android
To send an encrypted email on your Android phone, you need a third-party certificate management app to store your S/MIME or PGP/MIME certificate. Pay attention to the level of access these apps require, as sometimes they collect as much data as they aim to secure.
How email encryption works
Like any other encryption, email encryption turns your messages into a complicated cipher that can only be decrypted with a private key. The process ensures that even if unauthorized individuals manage to intercept the email, they won’t be able to read its contents.
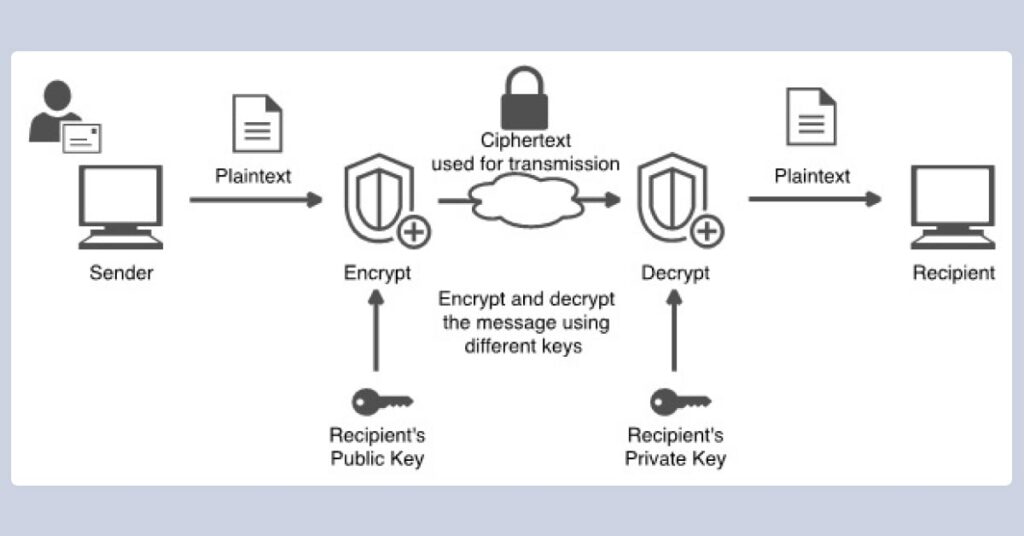
Public and private keys are used in asymmetric encryption methods. The public key serves to encrypt communication while the private key is necessary to decrypt it. This use of a pair of keys is called public key cryptography. Unlike the public key, which can be freely shared, the private encryption key remains confidential. The two keys facilitate secure communication, digital signatures, and other cryptographic functions.
Secure email services
Opting for a secure email service with integrated encryption is an excellent choice for personal mailbox use due to its heightened data privacy and protection. Email providers like Proton Mail and Tutanota provide end-to-end encryption by default, ensuring that only the intended recipients can access the content of the emails. These services often include features like self-destructing messages and two-factor authentication, bolstering overall security.
To encrypt or not to encrypt
Email encryption can be quite a hassle, especially if you want to avoid using third-party encryption add-ons. That said, in a landscape where information is both the currency and the vulnerability, embracing email encryption becomes a must to keep your digital connections solid and secure. Fortunately, whether through S/MIME, PGP, or secure email services, the power to control who accesses your messages rests entirely in your hands.
Types of email encryption
There are several types of email encryption methods used to secure email transmission. Their differences lie mainly in the ease of use, encryption levels provided, and compatibility with existing infrastructure. Let’s have a closer look at the three most commonly used protocols.
S/MIME encryption
S/MIME (Secure/Multipurpose Internet Mail Extension) encryption is the most common method of encrypting email messages. It uses certificate-based authentication for participants, a public key infrastructure (PKI), and supports encryption and digital signatures. It offers end-to-end message-level encryption, ensuring content security, and enables centralized key management in corporate environments. In contrast to methods like PGP and TLS, S/MIME provides a user-friendly experience, making it a practical choice for businesses seeking standardized encryption with authentication and integrity features.
PGP/MIME encryption
PGP/MIME (Pretty Good Privacy/Multipurpose Internet Mail Extension) combines PGP encryption with MIME email formatting to provide end-to-end encryption, digital signatures, and a decentralized trust model. Its main advantage is that it offers advanced control, as users can manage their key pairs and set encryption preferences. However, for this reason, it is considered less suitable for larger organizations that require centralized key management.
SSL/TLS encryption
SSL/TLS (Secure Sockets Layer/Transport Layer Security) encryption is widely used to secure website communications—it’s the technology behind the “https://” you see in web addresses, indicating a secure connection. When SSL/TLS is used for email encryption, it’s often referred to as “SMTPS,” “IMAPS,” or “POP3S.” Although this type of encryption secures the communication between email and client-server, its main drawback is that it does not provide end-to-end encryption, which means that it does not encrypt message contents.